

How to Inspect Your Air Ducts for Hidden Problems
Maintaining clean, efficient air ducts is vital for a healthy living environment. Whether your home is located in a dry desert climate, a humid region, or somewhere in between, air duct issues can creep in unnoticed. Hidden problems such as dust buildup, leaking joints, pest infestations, or moisture can compromise indoor air quality, cause higher energy bills, or even damage your heating and cooling system.
This article will guide you through a thorough, step-by-step process to inspect your air ducts for hidden problems. You will learn how to spot trouble early, understand common duct issues, and determine when it is time to call in the professionals. With this knowledge you can protect your home, improve air quality, and keep your HVAC system functioning at its best.
Why Regular Air Duct Inspection Matters
Inspecting your air ducts regularly is just as important as changing furnace filters or having annual HVAC maintenance. Here are the main reasons a duct inspection should be part of your home care routine:
-
Improved indoor air quality: Over time dust, pollen, pet hair, and other particles accumulate inside your ducts. This buildup circulates every time your HVAC system runs. Regular inspection helps you catch excessive dust or contaminants before they degrade air quality or trigger allergy and respiratory issues.
-
Better system efficiency and lower energy bills: Dirt, debris, or blockages hamper airflow. Poor airflow forces your HVAC system to work harder to maintain comfortable temperatures. Detecting duct leaks or obstructions early can improve efficiency, lower your utility costs, and reduce wear on the system.
-
Prevention of mold, bacteria, pests and dampness: Hidden moisture in duct joints, cracked ducts, or leaks can lead to mold growth, mildew, or even pest infestations. A timely check helps you identify damp spots, water infiltration, or structural damage before they become serious.
-
Prolonged lifespan of HVAC components: Dirt, strain, and inefficiency cause HVAC units to age faster. Clean, well-maintained ducts reduce strain on motors, fans, and filters, helping your system to last longer and requiring fewer repairs.
When You Should Inspect Your Air Ducts
While scheduling a full duct inspection once every 2 to 3 years is a good general guideline, certain circumstances call for more frequent checks. Consider inspecting your ducts under these conditions:
-
Right after moving into a new home, especially if previous occupants smoked or had pets.
-
If you notice increased dust on surfaces shortly after cleaning.
-
When members of your household develop unexplained allergies, asthma, or ongoing respiratory issues.
-
Before or after significant HVAC repairs or seasonal maintenance.
-
If your energy bills increase significantly without a corresponding change in usage or weather.
-
After a damp season, flooding, roof leak, or plumbing problems near ductwork areas.
-
If you hear unusual sounds when the HVAC system runs, like whistling, rattling, or banging.
Frequent checks under these conditions will help you catch emerging issues before they escalate into costly repairs.
Step‑by‑Step Guide to Inspecting Air Ducts for Hidden Problems
Here is a systematic process you can follow to inspect your air ducts thoroughly. This approach balances practicality with thoroughness, ideal for most homeowners.
Prepare and Gather Your Tools
Before you begin the inspection, assemble a few simple tools and gear:
-
A bright flashlight or portable work light to illuminate dark duct interiors
-
A screwdriver or drill (if you need to remove vent covers or register grills)
-
A small mirror (hand mirror or inspection mirror) to see into tight bends or behind ductwork
-
A camera or smartphone to photograph any visible issues for record‑keeping
-
A face mask and safety goggles to avoid dust and debris inhalation or contact
-
A notepad and pen to document observations and measurements
-
A ladder or step stool if ducts and vents are installed high up on walls or ceilings
-
A soft cloth or disposable wipes for cleaning vents after inspection, if needed
Having these tools handy makes the process smoother, safer, and more effective.
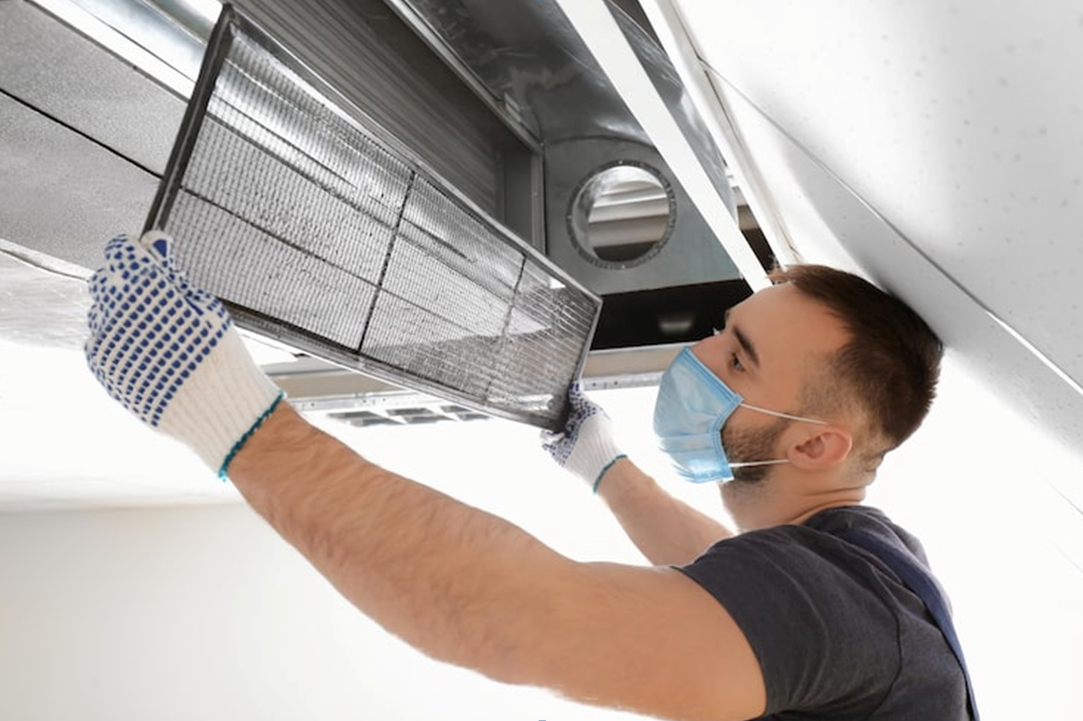
Check Vents and Registers First
Begin your inspection at the vents and air registers — these are the most accessible entry points to your duct system.
-
Remove vent or register covers carefully. Some are screwed in place; others simply snap or slide out. Keep screws or clips safe so you can reassemble later.
-
Shine your flashlight deep into the duct opening — as far back as you can see. Look for:
-
Dust or debris buildup accumulated on the duct walls or vent edges
-
Obstructions or blockages, such as small items, toys (in homes with children), or fallen insulation bits
-
Insect webs, droppings, or nests, which could indicate pest activity
-
Signs of mold or discoloration, such as black spots, green or brown streaks, or odd stains on duct walls or vent housing
-
-
Gently run your fingers or a soft cloth inside to test for loose dust. If an unusual amount of dust clouds up, that suggests heavy buildup.
If you see more than a thin layer of dust or discover visible contaminants, it may be time for professional cleaning. However, continue with the full inspection before jumping to conclusions.
Inspect Visible Ductwork in Attics, Basements, or Crawlspaces
Many duct problems hide in the portions of ductwork that run through attics, basements, or crawlspaces. This section often gets overlooked.
-
Walk through any accessible space where ducts run. Shine your flashlight along the duct length. Pay attention to:
-
Loose or disconnected duct joints or segments
-
Leaks, indicated by dust blowing or gathering on nearby surfaces, or by light entering duct joints from outside (hold a flashlight inside and look for air escaping)
-
Insulation damage — torn or missing duct wrap allows temperature extremes and condensation, which can lead to moisture problems
-
Crushed or collapsed ducts — older flexible ducts or poorly supported ducts may sag or get pinched, causing airflow restrictions
-
-
Gently tap along the duct seams and feel for softness, cold spots, or moisture. Softness or dampness may indicate water infiltration or condensation build-up. Mark such spots in your notes.
-
If ducts are metal, use your inspection mirror to see into bends or sections that are hard to reach. Photograph any questionable areas for further evaluation or to show to a professional.
Look for Signs of Pests, Moisture, Mold, or Biological Contaminants
One of the most often overlooked categories of “hidden problems” involves biological contamination or pest activity.
-
Pest evidence: Look for small droppings near duct openings, stains or greasy smears along duct surfaces (from rodent fur or insect movement), small nest materials such as shredded paper, fabric, or leaves tucked near joints. Listen for scratching or rustling sounds when the HVAC system is off and the house is silent.
-
Moisture or damp spots: Check for condensation on duct surfaces, especially in humid basements or crawlspaces. Feel the duct exterior for coldness or wetness. Moisture may accumulate due to leaks, poor insulation, or temperature differentials.
-
Mold or mildew growth: Dark patches, fuzzy or powdery growth on ducts or vent edges, particularly near joints or in damp areas, suggest mold or mildew. Even if you see only small patches, treat them as a warning — mold can spread fast through airflow.
If you detect any of these signs, note their exact location. These issues often require professional remediation, especially if mold or pests are involved.
Test Air Flow and Check HVAC System Performance
After physically inspecting ducts, you should examine how well air flows and how the HVAC system performs.
-
Turn on your HVAC fan or heating/cooling system with vents open. Walk through rooms one by one and locate every vent. Check for:
-
Consistent airflow: Hold a small piece of tissue paper near each vent. The paper should lift or flutter gently. Weak airflow or no movement suggests blockage or an issue upstream.
-
Temperature consistency: For cooling mode, vents should blow cool air; for heating mode, warm air. If some vents blow lukewarm or inconsistent temperature air, there may be duct leaks, obstructions, or insulation problems.
-
-
Listen for unusual sounds: Hissing, whistling, banging, or rattling when the system runs could indicate leaks, loose metal, or disconnected duct segments.
-
Feel for air leaks near duct joints: Running your hand lightly along duct joints while system runs may reveal escaping air. Escaping air sometimes feels cool or warm depending on system mode.
Record any irregularities you find and link them to the physical inspection notes.
Document and Evaluate What You Find
After your inspection is done, take some time to organize the observations:
-
Use your notes and photographs to create a simple map of your duct system, marking problem areas such as dust buildup, leaks, moisture, pest signs, or poor airflow.
-
Prioritize issues based on severity and risk. For example:
-
Critical: visible mold, moisture infiltration, pest infestation, major leaks, or collapsed ducts.
-
Moderate: heavy dust buildup, partially restricted airflow, torn insulation, or minor leaks.
-
Minor: light dust, cosmetic stains, or slight insulation wear.
-
-
Decide on your next steps. Minor dust may simply need careful cleaning and filter change. Moderate problems may warrant professional cleaning or sealing. Critical issues almost always require expert service or repair.
Consider scheduling a full duct cleaning if many of the following conditions apply:
-
Visible dust or debris across multiple vents or throughout ducts
-
Mold or mildew growth
-
Moisture or damp spots in ducts
-
Evidence of pests, nests, or droppings
-
Major leaks, disconnected ducts, or broken insulation
-
Noticeable improvement in airflow or HVAC efficiency is needed
Common Hidden Problems in Ductwork and What They Mean
When you inspect your ducts you might uncover a variety of problems. Here are some common issues, and what they can lead to if left unaddressed:
1. Dust and Debris Buildup
Dust, pollen, pet dander, fibers from carpets or fabric, and household particulates accumulate over time. This can:
-
Reduce airflow and force your HVAC system to run longer
-
Lower indoor air quality and trigger allergies or asthma episodes
-
Cause dust to resettle on furniture and surfaces, creating extra cleaning tasks
2. Leaks or Loose Duct Joints
Over time, duct sections can separate at joints, or seams can loosen due to vibrations from your HVAC system. Leaks lead to:
-
Loss of conditioned air into unconditioned spaces (e.g. crawlspace, attic, walls)
-
Higher energy bills because your system works harder to compensate for lost air
-
Poor temperature balance between rooms
3. Poor or Damaged Insulation
Lack of proper insulation, or torn duct wraps, often causes temperature loss or condensation when cold air passes through warm spaces (or warm air through cold spaces). Consequences include:
-
Energy inefficiency
-
Moisture buildup that may lead to mold growth
-
Ineffective heating or cooling
4. Moisture, Mold, or Mildew
Moisture can come from poor sealing, condensation, leaks, or damp basements and crawlspaces. Once inside ductwork, moisture promotes:
-
Mold or mildew growth, which spreads spores throughout your home every time HVAC runs
-
Structural damage to ducts or neighboring materials
-
Unpleasant odors and potential health risks
5. Pest Infestation
Rodents, insects, or birds may use ductwork as shelter. Their presence can cause:
-
Droppings, hair, insulation damage, or nest materials that block airflow
-
Gnawed ductwork leading to leaks or exposed insulation
-
Health hazards from bacteria, allergens, or droppings
6. Airflow Restrictions or Blocked Sections
Ducts that are crushed, bent, pinched, or obstructed by foreign objects will restrict airflow. This leads to:
-
Uneven heating or cooling across rooms
-
Overworked HVAC system, higher energy usage, and possible premature wear
-
Some rooms may remain uncomfortable despite system effort
7. Structural Damage or Disconnected Ducts
Older ductwork or poorly installed systems may suffer from disconnected segments, gaps, or even collapsed ducts. These problems often lead to:
-
Significant energy loss
-
Poor air distribution functionality
-
HVAC system inefficiency or complete failure in worst cases
Understanding these common problems helps you know what to look for during inspection and what kind of remediation may be required.
When to Call Professionals for Duct Cleaning Utah Services
Some inspections may reveal minor dust or debris that you can clean yourself. Other times, you might need professional help. If any of the following apply, consider contacting a licensed air duct cleaning company or HVAC specialist:
-
Widespread dust or debris across multiple rooms or throughout the entire duct system.
-
Visible mold, mildew, or consistent dampness inside ducts.
-
Evidence of pests, insect nests, droppings, or pest damage.
-
Significant leaks or disconnected duct segments that you cannot safely seal yourself.
-
Severely restricted airflow, uneven heating or cooling, or high energy bills despite well-serviced HVAC equipment.
-
You lack the tools, safety gear, or confidence to perform detailed cleaning or repairs.
-
You just moved into a new home and want to start with a clean, professionally sanitized duct system.
If you live in Utah, especially near Salt Lake City, you may consider contacting specialized local services. For example, companies like sanitairllc air duct cleaning salt lake city can offer thorough professional duct cleaning, inspection, and remediation. Seeking professional duct cleaning utah services ensures that hidden contaminants get properly removed, duct leaks get sealed, and your overall HVAC system gets evaluated for optimal performance.
Best Practices Before and After Duct Inspection
Performing a duct inspection is not a one‑time job. Following these best practices before and after inspection helps maximize the benefits and keep your system healthy long‑term.
Before Inspection
-
Change or replace HVAC filters. Clean filters help you get a clearer sense of duct condition. Dirty filters may mask deeper duct problems by trapping dust early.
-
Schedule inspection when system is off. Turn off furnace or air conditioner for at least an hour before opening vents to avoid blowing dust and debris around.
-
Wear protective gear. Use mask, gloves, and goggles if you expect heavy dust, mold, or debris. This protects you from inhalation or direct contact.
-
Have a vacuum or air blower ready (for settled dust) after inspection so you can clean vents without scattering dust throughout your home.
After Inspection and Cleaning (DIY or Professional)
-
Replace filters regularly. Depending on filter type and dust levels, replace filters every 3‑6 months or as needed.
-
Seal or tighten any minor duct leaks you discovered using metal foil tape or duct sealant tape, especially around joints and seams.
-
Restore insulation where damaged. Proper insulation helps prevent condensation or energy loss, especially in attics or unconditioned spaces.
-
Perform a follow‑up airflow test and visual check 1 or 2 weeks after cleaning or repairs to confirm the improvements took hold.
-
Keep a maintenance log. Note down inspection dates, issues found, repairs or cleaning performed. This record helps track duct health and plan future maintenance.
How Professional Duct Cleaning Works and What to Expect
If you decide to call a professional duct cleaning service, here is what typically happens. Understanding the process helps you choose the right provider and know what to expect.
-
Initial assessment and inspection
A technician will examine your duct system, vent covers, air handler, furnace or air conditioner, filters, and overall airflow. They may use cameras or mirrors for hidden areas. -
Pre‑cleaning preparation
The team covers floors and furniture to protect your home from dust, sets up negative pressure (vacuum system) equipment, and may brush or agitate duct surfaces to loosen dust or contaminants. -
Duct cleaning and vacuuming
Using specialized vacuums and brushes or air whips, technicians clean the interior of ducts, air handler components, blower, coils, and more. Dust, debris, and contaminants are extracted. -
Mold, mildew, or pest remediation (if required)
If mold, moisture, or pests are discovered, professionals apply appropriate treatments, seal leaks, repair duct segments, and may recommend insulation or moisture‑barrier improvements. -
System re‑assembly and final testing
After cleaning, vents and registers get reattached, filters replaced, and the HVAC system runs to test airflow and temperature consistency. Technicians may also explain findings and suggest future maintenance steps. -
Documentation and reporting
A good provider gives you before‑and‑after photos, a summary of issues found, work done, and recommendations for future care. This transparency helps you maintain records and schedule follow‑up inspections.
If you work with a professional in Utah or Salt Lake City area, make sure they are properly licensed, insured, and experienced with local climate conditions. A provider like sanitairllc air duct cleaning salt lake city may offer local expertise to handle the unique demands of the region, such as seasonal dust, temperature extremes, or pollen.
Frequently Asked Questions (FAQ) About Duct Inspection and Cleaning
How often should I inspect my air ducts?
A full visual inspection every 2 to 3 years is a good baseline. If you have pets, allergies, or live in a dusty area, more frequent checks — every 1 to 2 years — make sense. Also inspect after moving into a new home, seasonal transitions, or if you notice odd symptoms like allergy flare‑ups or high dust accumulation.
Can I rely solely on filter changes to keep ducts clean?
No. While clean air filters are essential, they only protect the HVAC unit and immediate vent area. Dust and contaminants deeper in the ductwork still build up over time. Regular duct inspection and cleaning ensure cleaner air distribution throughout your home.
Is DIY duct cleaning safe and effective?
DIY cleaning can handle light dust around vents. However, reaching deep inside ducts, especially elbows or long runs, is difficult without proper equipment. Professional duct cleaners have specialized tools to thoroughly clean and extract dust, debris, and contaminants safely.
How do I choose a reputable professional duct cleaning service?
Look for a company that:
-
Is licensed and insured
-
Offers a written scope of work and transparent pricing
-
Provides before‑and‑after documentation (photos, airflow readings, system inspection summary)
-
Uses high‑efficiency vacuum systems, not just blowers
-
Has good customer reviews and references
If you live in Utah consider a local provider offering duct cleaning Utah services to ensure familiarity with regional HVAC challenges
Does duct cleaning help with allergies or asthma?
Yes. Removing dust, pollen, pet hair, mold spores, and other airborne contaminants from ducts can reduce allergen circulation. For allergy sufferers, professional cleaning combined with frequent filter replacement and regular HVAC maintenance makes a significant difference.
Conclusion
Regular inspection and maintenance of your air ducts is one of the most effective steps you can take to ensure healthy indoor air quality, comfortable temperature control, and energy efficiency. By following the step-by-step inspection guide laid out above you can catch hidden problems early, prevent costly repairs, and enjoy a cleaner, safer home environment.
If your inspection reveals heavy dust buildup, mold, pest infestation, leaks, or restricted airflow, it is wise to call on experienced professionals. In places like Utah, where certain seasonal environmental factors may contribute to duct contamination and wear, you can benefit from localized expertise. Services like duct cleaning Utah — for example from providers such as sanitairllc air duct cleaning salt lake city — offer thorough cleaning, inspection, and remediation tailored to the climate.

